craft

Prepare the Perfect Candy Buffet in 4 Steps

Candy Buffet 2

photo by Phillippo Photo- Indiana

April is here and wedding season is upon us! These days it’s not enough to just have a cake at your wedding, candy buffets are a must! Brides have been getting super creative with their dessert offerings and candy buffets are a fabulous, fun option to take care of even the biggest sweet tooth on your big day!

How to Create the Perfect Candy Buffet:

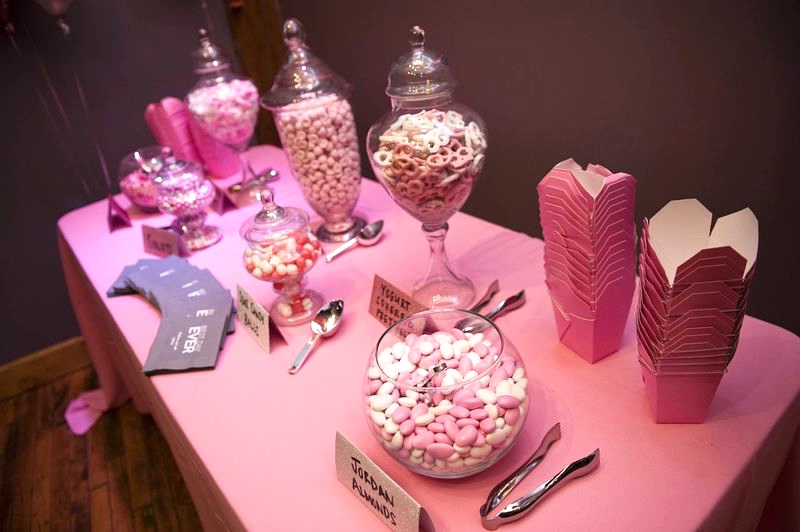
  1. Pick a color scheme- This may seem obvious, but before you do anything you need to nail down your color scheme. For most, this will simply be your wedding colors, but sometimes you need to add a color to compliment your pop color (like the white in the pictures shown). I love focusing on shades of colors rather than being too matchy-matchy. This gives your candy buffet dimension and can even give you flavor variety!
  2. Get your canisters- Now you need to figure out placement in your venue and the size of your table. This will help you get an idea of how many canisters you can fit. I ended up with room for seven canisters (all from Michaels) and took the pyramid approach. Symmetry is key! I bought one big canister for the middle and built the table out from there. Play with the set-up! I chose to keep my candy buffet simple, but you can do a big floral arrangement in the middle, your wedding cake or even a display of cupcakes. One last note on canisters, make sure it’s easy to get candy out of them for your guests, you want to make sure your guests spend more time dancing than in line for candy!
  3. Pick your candies- This step is crucial. It can make or break a candy buffet. Let start with the variety. Even though I wish everything all the time was chocolate, you have to have variety for your guests. A few of the favorite candies from my wedding were taffy (people loved to just grab them out of the jar since they were wrapped), Sixlets (similar to M&M’s) and yogurt covered pretzels. I ended up getting most of my candy from Oh Nuts!, they have a huge variety and you can shop by color or flavor and can even schedule your delivery. It made shopping a breeze! Now for the big question, how much do you buy? I found this to be the hardest part of the candy buffet! There are a lot of guidelines out there about how many pounds/guest you should buy, but when I really started to think through it those guidelines are so arbitrary! Since it’s based on weight, one pound of yogurt covered pretzels is going to be much different than one pound of M&M’s. To solve for this, I created a simple spreadsheet to help visual what I was actually ordering. Check it out here! This spreadsheet really helped me decide if a candy was worth it from a cost perspective and if I would have enough candy per person to fill up my favor boxes!
  4. Candy Buffet 1
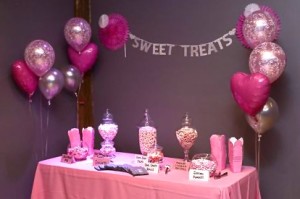
Time for accessories!- Now it’s time to glam up that candy table! First you need favor bags/boxes. I ended up ordering my pink chinese takeout boxes pictured from Amazon, but there are a ton of options out there. When ordering candy, consider how large your favor bags will be. The bigger the bag, the more candy the guest is likely to take. Most people seem to fill it up to the brim! If you are opting for a bigger option like me, make sure to air on the more generous calculations of candy/person. You will also need scoops and/or tongs. Your catering company might provide these, but if not I found these great silver utensils from Party City. Just be mindful of the type of candy people need to get their hands on. I found for the candy I bought, I needed a mixture of scoops and tongs, and it doesn’t hurt to get extras! Now for the fun stuff, labels and decorations. I chose to keep mine simple with a matching tablecloth, a sparkly banner, homemade labels, some balloons and personalized napkins, but the sky is the limit here! Have fun with it, just don’t forget the essentials!

Creating your own candy buffet and have questions or do you just have ideas to share from doing your own candy buffet? Please share in the comments below! And for more candy buffet fun check out the blue candy buffet below we put together for my sister’s baby shower!


Boo! DIY Repurposed Wine Bottle Halloween Decor

I love going all out for holidays, the food, the decorations, the parties, it’s always a ton of fun! But making your home festive for the holidays can definitely add up if you aren’t careful.

That’s why I try to stick to DIY options, especially for home decor. The best part about DIY is being able to repurpose things you already have around your house and bringing them new life. Last year, I painted a few old wine bottles to add a halloween touch to my apartment and they turned out great! They’ve held up great too, I just took them out of storage to add to my decor this year too!


Things you will need:

  • Wine bottle(s)
  • Warm water
  • Dish soap
  • Waterproof acrylic paints- These Martha Stewart ones work great!
  • Paint brushes
  • Optional- Dish brush


Now that you have all your materials, it’s easy!

  1. Remove the label from the wine bottle. This is easier said than done. After I did one, I realized it’s not even worth trying to peel it off dry. I suggest soaking the bottle in hot, soapy water for about an hour. By this time, most labels start to loosen up. Now, you just need to scrub it off. I used a dish brush to help me scrape off the labels. If you are having trouble getting yours off just soak it overnight in hot, soapy water, that will definitely loosen it up!
  2. Once you have a clean bottle, you need to let it dry completely!! This is very important! You do not want to be too eager and start painting before your bottles have thoroughly dried. If you want to speed the process along you can use some rubbing alcohol to dry out the glass.
  3. Now it’s time to paint, get creative with your characters! I love mixing it up with candy corn, jack-o-lantern and frankenstein. But there are tons of possibilities. You can go spooky or sweet! Try spelling out B-O-O or even add ombre to you designs! Just make sure to use waterproof paint!
  4. Voilà! You have some fun new halloween decor that costs next to nothing!

Boo! DIY Repurposed Wine Bottle Halloween Decor

DIY Intersecting Circles Art

Although we’ve lived in our apartment for almost a year, I’m still trying to find ways to add character and to make it our own. Lately my energy has been focused on our bathroom- it’s white, ALL white! I’ve been looking for a piece of art to add some color to the walls, but haven’t found anything that fits our style. Then I came across this DIY Intersecting Circles Piece from Tristin & Company and loved the unique pattern. Since I’ve never been one to shy away from a DIY project, I thought this could become the perfect customizable artwork for our bathroom.

I do love Tristin & Company’s finished product, but I wanted to update it by adding some fun prints to mine. Instead of using paint chips like Tristin & Company did, I decided to use magazine clippings. I wanted to be able to bring some of my favorite patterns and pictures into the piece and I ended up loving how the final product! The magazine cutouts add the funk and humor I was missing in the original project.

Tristin & Company have great directions on their site, so I will just give you the cliff notes version.

First you need to make your football shaped template. It’s important to start with a circle that has the right diameter for your canvas. The key is to find the common denominator of the width and height of your blank canvas. I chose a 16×20 canvas, making the common denominator and the diameter of my circle 4. A compass is the best way to get the perfect sized circle, but if you are like me and haven’t seen one since middle school, you can go around measuring candles, vases, etc until you strike gold and find the right size.

To make your template:

DIY Intersecting Circles Art     DIY Intersecting Circles Art DIY Intersecting Circles Art DIY Intersecting Circles Art

1- fold your circle into quarters

2- cut two quarters out of the circle and face the curved edges toward each other

3- overlap the two quarters and trace along the curved edge to make a football shape

4- cut along the traced line and you have your football shaped template!

Next I got out my latest vogue and went to town cutting out footballs! Four football shapes are needed for each circle. Since my canvas was 16×20 inches (4 circles x 5 circles), I needed 80 football shaped magazine cutouts. Now you’re ready to start putting the pieces of the puzzle together. You will need your canvas, magazine cut outs, canvas and Mod Podge.

DIY Intersecting Circles Art

I started by LIGHTLY tracing the circles on the canvas to give me some guidance for placement. (If you look really close you can see my light blue tracings)

DIY Intersecting Circles Art

I suggest taking the placement circle by circle, lightly filling each circle tracing with Mod Podge, then placing the footballs exactly where you want them. Be careful, since magazine pages are so thin the footballs rip very easily once placed on Mod Podge.

After you fill your whole canvas with footballs, start your coats of Mod Podge! After 3-4 coats, you have a masterpiece! What I love most about this project is the ability to completely customize and have fun with it. Also, if you get bored it can quickly turn into a game of I SPY! 🙂

DIY Intersecting Circles Art

Each one of these footballs pack a ton of personality. I added pieces of some of my favorite brands’ advertisements, a picture of a building in Italy reminding me of our honeymoon and I even snuck Minnie Mouse in! This project took a lot of patience, but it was also a ton of fun!

Renegade Craft Fair- San Francisco

Renegade Craft Fair SF- glamourita.com

renegadecraft.com

This past weekend, the Renegade Craft Fair passed through San Francisco and for those of you who don’t know, the Renegade Craft Fair is a network of events throughout the year that cater to the DIY & craft community. The RCF travels throughout the country (and to the UK) to 14 annual events in Chicago, New York City, San Francisco, Los Angeles, Austin, Portland, and London. The businesses that fill the aisles of the fair are all creative and inspiring; they range from home décor and stationary, all the way to stuffed animal taxidermy. You could spend hours (and a lot of money!) shopping all the different vendors.

Some of our favorite items were the creative posters and prints. Below is a sampling of some of the posters we ran across. The cocktail prints on the left were especially fun! They give a visual makeup of the ingredients of different cocktails, these would look great above a bar cart or in a kitchen.

Pictured below was one of the stores we really loved, Alibi Interiors. This shop had a rustic charm and each piece really felt unique since they were made with reclaimed wood. I have been thinking about creating a gallery wall in our living room, so I have had my eye out for small unique frames and décor. This shop had just that! Some pieces were all natural and others were painted colors, including metallic gold! They had a good mix of frames in all sizes, making it a breeze to find what we needed. (check out the bookshelf of frames!)

Renegade Craft Fair SF- glamourita.com

Renegade Craft Fair SF- glamourita.com

Renegade Craft Fair SF- glamourita.com

Renegade Craft Fair SF- glamourita.com

We loved this shop so much, we ended up leaving with the frames and chalkboard below. We also snagged this adorable bear plank sign from JunkArtGypsyz. They had some awesome pieces, including marquee letters and wooden cut-outs. With these finds from the fair, we now have a solid start on our gallery wall. I can’t wait to share how it turns out!

The Renegade Craft Fair will be in Los Angeles, CA next weekend, see the full schedule below. If it’s stopping by your town, I recommend you attend… and bring your wallet! 🙂

Renegade Craft Schedule

renegadecraft.com